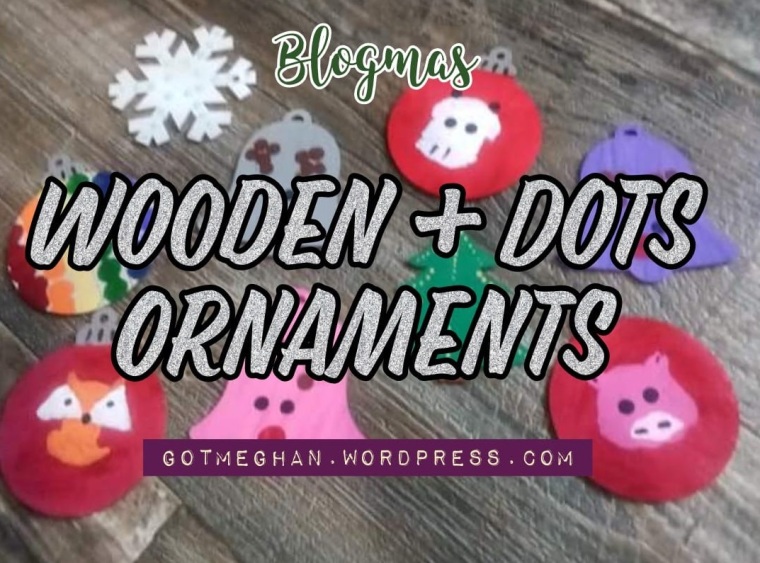
Blogmas: Wooden + Dots Ornaments

Hello!

As you may have noticed, and I still don’t know what happened because I had plans, but we didn’t put out any pumpkins this fall. My sister did, she decorated her entire front porch with various sizes of pumpkins, but we did not. I found it very surreal, because that’s my favorite thing to do in September and October is paint pumpkins. After that, I think my body was like, “okay, we need to find an alternative fast!” because this project came out of nowhere, but it ended up becoming a new favorite of mine.

In mid-October, I started looking for birthday gifts that weren’t books (I know it’s shocking!) and I found these wooden shapes and I sort of fell in love with them and then I found ones that were Christmas related and then all hell broke loose in my brain!

In the last year and a half, I’ve been watching a lot of reels and regular videos on YouTube of dot art. I still don’t remember what inspired the find in general, but I’m forever glad it came into my life. I used it in my 3 projects last Christmas. It was only a simple red dot here and there with a Q-Tip but it was still a new thing for me and I loved it. I have been working on it throughout 2021 and I finally felt comfortable enough to use the technique in my new project: the Christmas ornaments!


What you will need for this DIY:

  • Wood cut outs – it’s important for them to be “unfinished”
  • Acrylic paints
  • Paintbrushes
  • Dotting tools
  • Damp washcloth
  • Paint palette or paper plate(s)

Before we get too into this part of the post, I wanted to show you how the ornaments came in the mail.

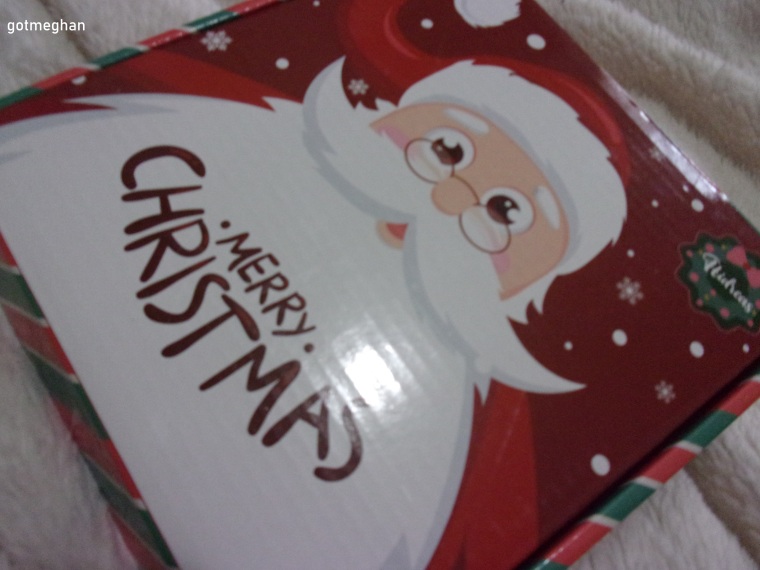
They were perfectly stuffed into this cute Santa Claus box. I was originally going to get the 160 pieces but I’m glad I switched to the 40 pieces because I would still be painting right now! Anyways, they were four traditional Christmas characters: a snowflake, bell, tree and baubles. You get 10 in each stack, so you have multiple designs you’d like to trade off, you are welcome to do it evenly. If you would like to purchase this set or the others, click here for the Amazon page. You also get clusters of string for each of the ornaments, plus a small bag of metallic beads, but I did not use them.

Raining Dots

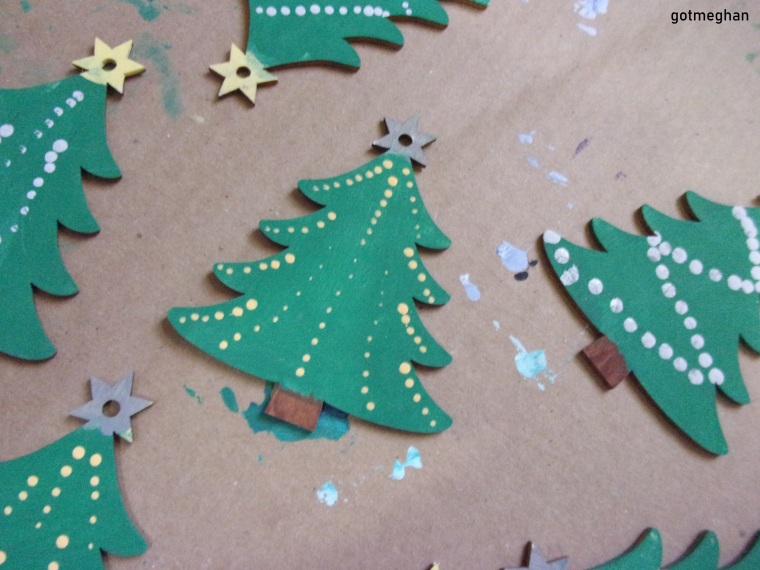
I started with the Christmas trees, and I copied the same color scheme I did with my last project, so I mixed my green with a tiny bit of blue and I love how they all came out. After finishing all 10 trees with their base coats, I moved on to the trunk and I poured a small amount of brown into my palette, and I used one layer of paint for that part. I am a lover of DecoArt acrylic paints, (thanks to Lydia May on YouTube!) I usually don’t need more than two coats depending on the shade, and I was very happy with my color choices this time around, including the yellow!

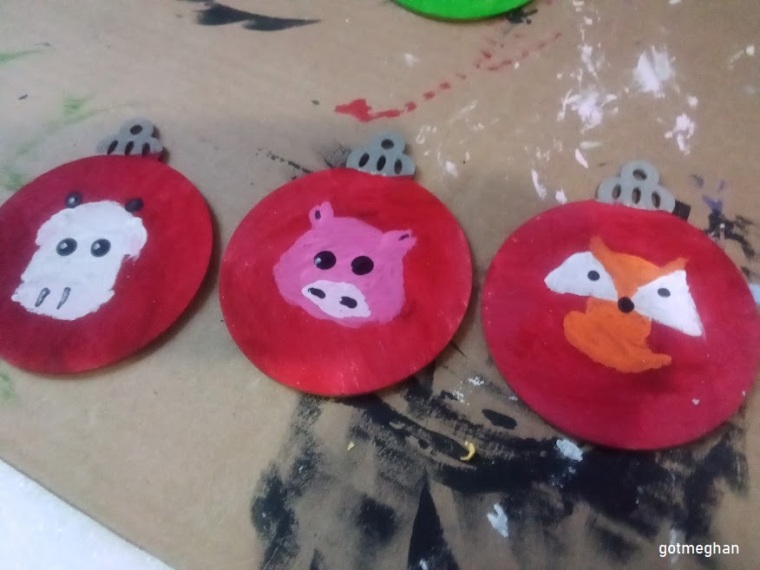
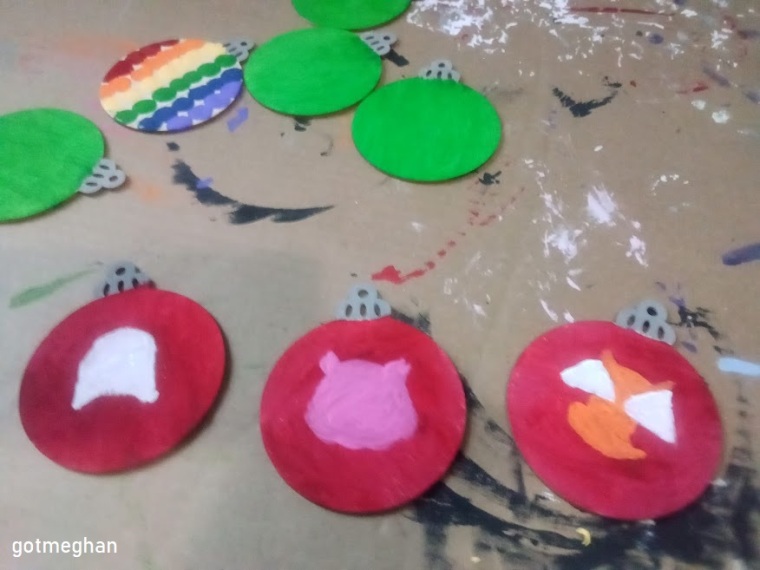
Once everyone was in the process of drying, I switched my attention on my design ideas for a few of my baubles. I knew I wanted to create a series of animals, but I’m not really good at it so I went looking on Pinterest and found a great step-by-step guide of the Fox for my friend Brittany. She was the one who really inspired this part in the first place. I continued to search for guides of the Cow and Pig, but I wasn’t able to find anything, so they were basically all free-foot sketches. After that, I stopped for the day, and came right back to it the next day.

A couple of weeks ago, I was finally able to add another selection of dotting tools. I have the smaller sizes, and I’ve been using them for about a year now and they are very nice for me to grip my toes around and make my dots, but the others are various sizes and I have been wanting to get them for a while now because I wanted to try my foot at the larger dots. I am having issues how to grip them, but I expected that to happen. I knew I wasn’t going to go all out with my designs (honestly, I had the phrase, “less is more” in my mind the whole time!) and I tried to keep it that way.

When I came back to my trees, I was ready to decorate everybody, and I used two colors: yellow and a light gray (I mixed my gray with a tiny bit of white!) and I painted the stars with those colors and would switch the yellow star with silver garland. I was smart with this; I drew out a zig-zag design on most of them and would follow the lines with my dotting tool and I really loved it! Some look like traditional Christmas trees, but there are five of them with the “walking technique” which is coating your desired tool with paint and dotting down the canvas, I love this so much I did it to my Bonsai pot in the spring! My parents saw the final tree with this design, and they love it. Honestly, everyone I’ve shared it to, has expressed the same thoughts too!

So, here are how the trees turned out.

There Goes Rudolph!

The second (or third) shape were the bells. I wasn’t impressed with the bells at all, they were very boring even without paint on them…

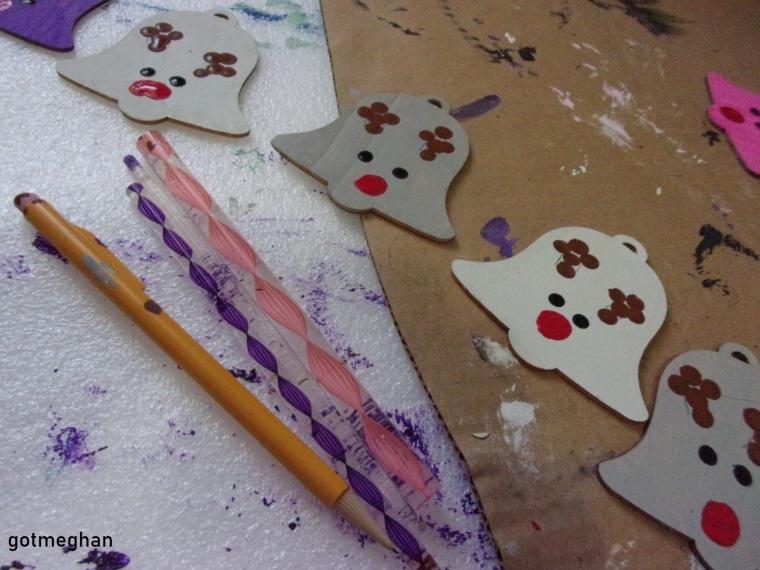
My thinking behind them was the golden bells you normally see on pictures, but I could not get the yellow to turn to a pretty gold and I tried like three different times and was only successful after finishing with them. I was so mad at that point, but I moved on though. Since I had 10 of these bells, I was influenced by a fragment of a carol “with silver bells ringing” I kept hearing while doing the base colors and I created the silver hue again for the rest of my bells and I thought they looked so adorable!

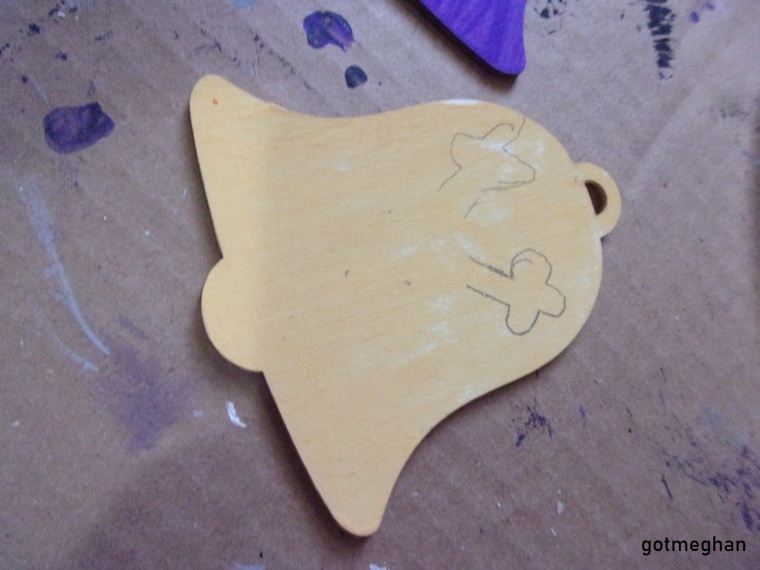
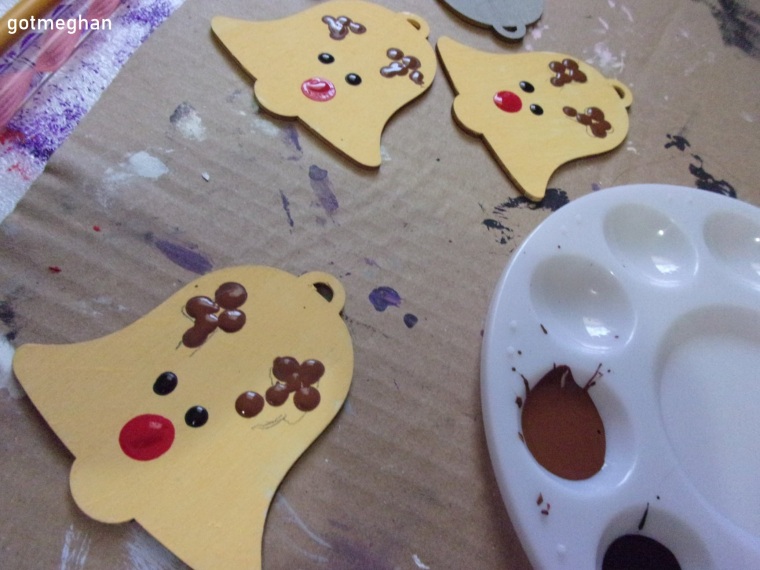
I left to dry overnight and I was really worried about how boring they looked, so that night I thought about adding a reindeer face on it and in my dreams they looked so cute and I was over the moon when I started sketching out how I wanted the antlers to go, but once I started doing my dots I got a little worried because the design started to look a little bit like a pair of balls and by my second bell, I became terrified at what was appearing but thankfully my mom thought they were great, especially after I put the eyes and big red nose at the end.

The reindeer/bells are definitely my favorite, even with the cock and balls antlers, they still look amazing! I did a good job on them and that’s something I rarely do when it comes to painting, is enjoy what I am creating, and lately it’s been so fulfilling to believe in my artwork for the first time.
Let It…

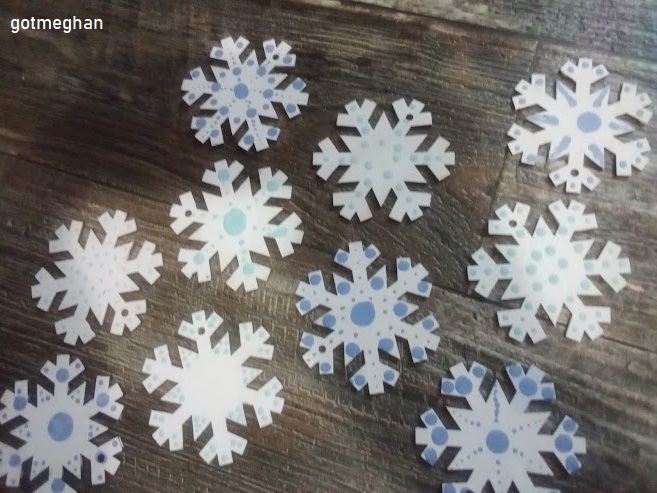
For the third ornament, we have snowflakes.

I think both the trees and snowflakes were the easiest to do because they required a small set of skill. You can free hand your designs to make things simple and they would still end up being very beautiful. When I began on the snowflakes though, I thought I would be able to play with my various sizes of tools, but I rarely got away from the blue tool, which is a little bit bigger than the purple tool. I basically treated the flakes like the trees when it came to their designs and used the walking technique quite a bit throughout the process.

And like the trees, I kept my color scheme pretty limited, I only used white for the base and used two different blues, but my favorite shade was the bright, neon like because it reminded me of the Frozen films. I’ll be honest, I had Queen Elsa and Princess Anna (and of course, Olaf too!) in my head all while I was working on these and I’m glad I did because it got me out of my head, and I allowed myself to make mistakes with them because I mean every snowflake is one of a kind so I just left them the way they were… well, some of them! There were 3 that definitely had to be fixed but after I was done, I basically pushed them as far away as possible, so I wasn’t able to add more dots!

The Cast of Characters

Lastly, the bauble balls were my least favorite because I knew what I wanted to do with a few of them and it scared the living daylights out of me! I got through in one piece thank God, but not without psyching myself out in the first round.

So, like I explained above while I was waiting for my trees to dry, I got started on figuring out what I wanted for three of my baubles, the rest was pretty much left until I did the base coats. I treated the baubles like the bells, as I split them up as they were painted in traditional Christmas colors: green and red. I was so worried the red would be too dark for my animal baubles, but thankfully they design held up great against the paint, and I was still able see every part.

My biggest worry now was, do I have a brush that was small enough to paint the character without creating a big mess around it, and I was thoroughly surprised as I found a tiny brush that was not only perfect for the designs, but it quickly became a favorite of mine because it allowed me to gain back some of the control as far as what I wanted to bring into each animal. I didn’t stop using my dotting tools though as I had made the eyes and noses with a small tool, and they turned out as adorable as my Rudolph/reindeers in the end.

When I was done with them, I was fairly tempted to leave the rest of the baubles plain, but I thought they looked too boring for that, and I started experimenting and I made array of different ones but I did one that spells the word “Woof” for a family friend, they have a Pittie and they recently got a Beagle puppy so as my mom told me, “it fits” for them, and then I surprised myself again but creating two baubles in a Ugly Christmas Sweater design and I’m still upset I did just do that with the rest but it was just a beautiful disaster that I need to remember for next Christmas!

Bring Me the Rainbow

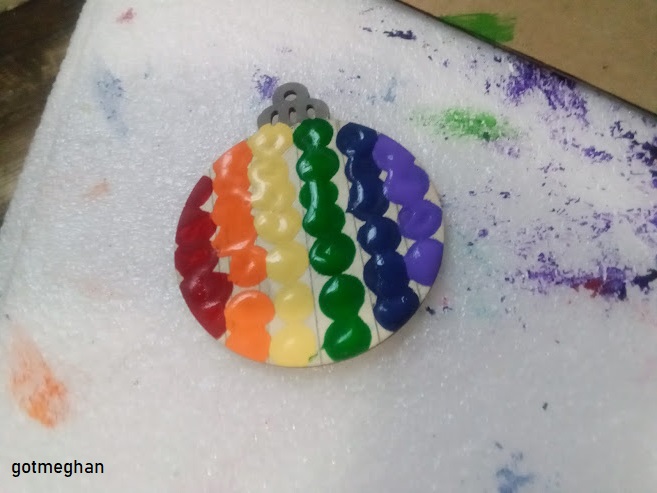
My final bauble is very special because it is my nephew’s. Nolan has become obsessed with the moon and rainbows, and since I already got him a Moon phase garland for his room, I figured I needed to bring out his love for the rainbow too, so I reserved a bauble ornament for him. I don’t know why I didn’t do this with my nana’s ornament since she too is obsessed with the rainbow! Oh well, I will make a note of this for next year!

I was thrilled to do this for Nolan but I was also terrified too because I had to use the ruler to create a series of lines for each color, and honestly, this was a doozy! I was having a hard time making six, somewhat equal, lines for each dot and it was a hard task at first but once I got it all figured out, I poured out my paint on my palette and got to work on the actual dots.

This media has also become a favorite of my nephew too. He currently had two or three CDs I’ve made in the last year or so, the first one he just took home and the others I gave him because he kept holding onto them. I think in the new year, I will try to teach him how to do it so he can be excited about his own creations too! Anyways, I used my pink tool, which is the middle size and honestly, it was actually perfect for this design. I was going to use the tiny brush again to remove the empty spaces in between the dots but I stopped myself from doing it and messing the entire ornament up. Nolan was very excited to get his ornament. I don’t think he understood at first why I had given him a different design compared to his mommy’s pink reindeer, but I know he will cherish it nonetheless!

It is strange when a small thought that can appear in the middle of a sleepless night, can grow into such a huge project and yet bring so much good to a slice of the world. Homemade gifts are good for the soul. I give kudos to anyone who has a small business and fix up orders every day, because that is no small feat! As I told my nana the other day, now that I am done painting and the cards were shipped out and people are receiving their ornaments, I still feel like I need to be doing something, and I really hope it was finishing this post.

I really hope you have enjoyed reading my process with this project. It was fun while it lasted, and now I can relax for the rest of this break. If you celebrate Christmas, I hope you have a lovely time with your family, friends and/or pets. For anyone else, have a wonderful weekend!

How I Decorate For Autumn!

Hello!

I bet you’re confused–it’s Monday but I’m not publishing a music playlist! I still think you’ll enjoy the change though, especially if you love decorating as much as me.

In September, I was able to get some fall décor for my room and I said towards the end of the post that I was going to hopefully show you where each item would end up, byway of a little tour. I’m not yet comfortable showing off my entire room, instead I’m just going to explain my way of thinking (or at least try to!) into how I wanted everything to look in certain areas, plus share with you how everything started out and the changes I made throughout the dreary season!

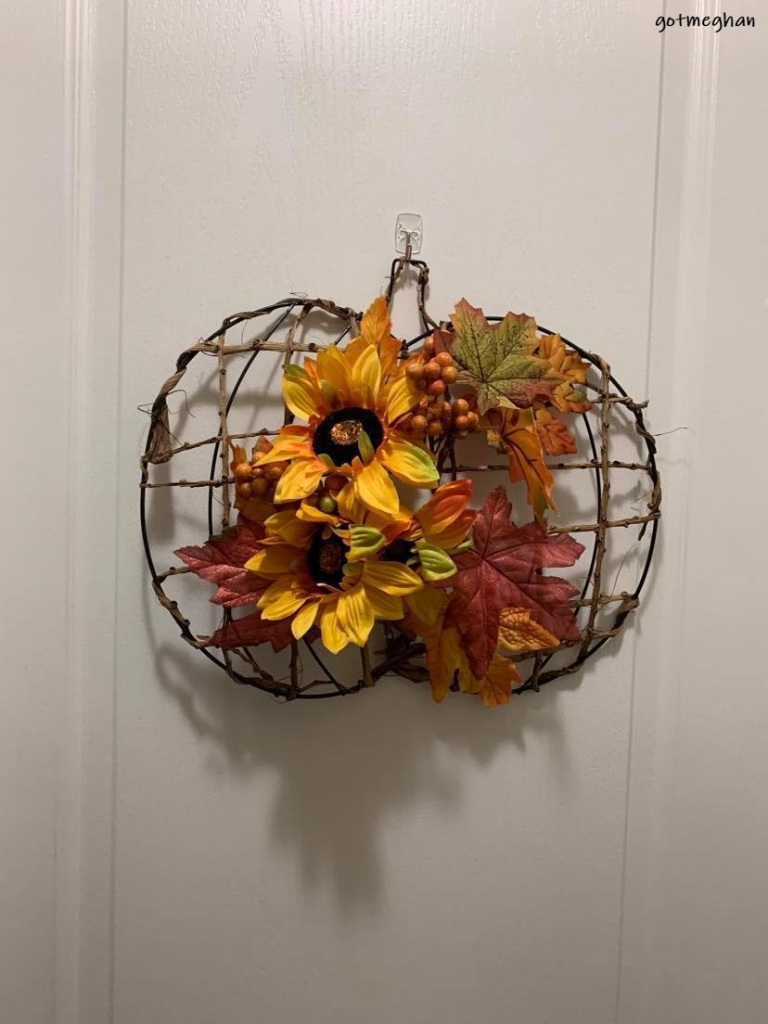
Let’s start with my door, because I have the only thing that has never changed places since it arrived to our house, and it is the pumpkin styled wreath that has faux berries, flowers, and leaves placed in the middle of the structure. It gives you a little sneak peek into what you will surely see once you go into the room.

I have really enjoyed seeing this wreath every day, and will probably be really sad to see it go once we get our Christmas decorations out sometime this week. As of now, I do not have a Christmas wreath and I don’t know if I will have one at the moment, but if I do find the perfect one, I’ll be posting it on my social media for you all to see of course!

One of my favorite things about my room is that I have a space in between two of my large treasures that allows me to not only have a Christmas tree but a good size autumnal display as well.

My mom purchased this absolutely beautiful sunflower rug when we first moved in two years ago, because the rug next to my bed blends into the floor but when we transferred from the bed to the wheelchair or commode–because we tried both!–my feet were slipping and sliding all over the place! What was really funny about this, is that on the tag it says, “non-slip” and although the rug never moved, we knew it wouldn’t be a good idea to keep it there! The material is like velvet, so really fuzzy and soft but apparently not great for what we do in front of the bed, so it was moved by the window and would be used for decoration for all holidays.

119198126_1552175588300407_2043513110576606394_n (2)

I have loved only having one window, in my room,. In our old house, I actually had two windows, but I only used one because the other was covered with plastic to keep out the cold in the colder months.

The placement is perfect in many ways, if you pay attention to my “Three Good Things” on Instagram and Facebook in the evenings, you know how much I like to bird watch as I have quite a few bird friends that live in and around our backyard, but it is also the best backdrop for décor and even for my blog photos!

I have a translucent curtain with orange-y sunflowers all throughout; once I found it, I thought it would be different from having the normal thicker and darker shades of fabric and the latest addition are white cord lights all around the sides and front of it, which makes you feel cozy like instantly. I cannot tell you how happy I am when it’s nighttime and see the whole room illuminate in this warm glow and I feel so safe inside compared to how I felt in our old house.

Anyways, I have always wanted to decorate that area for the holidays. Christmas is easy because it is the perfect width to support a tree that’s both small and tall as you’ve probably seen in my posts last year. However, for autumn, I wanted to create a little oasis, that would blend in with the curtain, lights, and rug and thankfully I found some stuff that was perfect to showcase my love of fall.

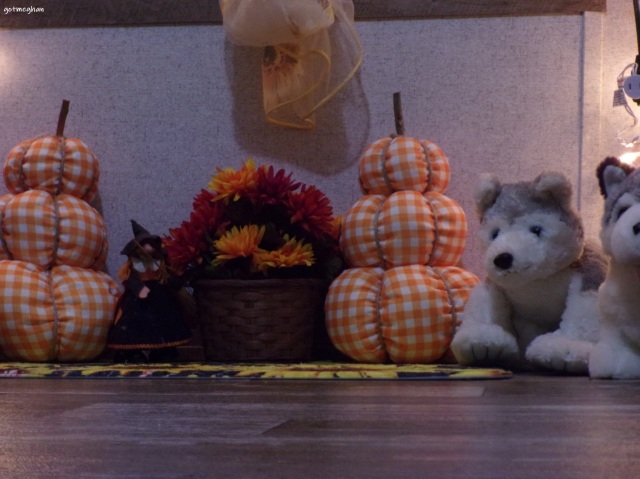
When the stacked pumpkins arrived at our door, I knew that they would be perfect in the space in front of the window, but finding something that would separate them a little was somewhat difficult. I have another faux flower arrangement in a basket, and I’ve had this for years and have used it as props for blog posts but never had a place where they looked like that on purpose so I thought of putting it in between the pumpkins and placing other autumnal things around them. It took me a bit to arrange everything together, but I did get it all together where I thought I was happy with, but then within a week after taking my pictures of the finished project, I was given even more stuff to spruce up the piece again.

This is what it originally looked like for a good week and half until I changed most of the layout.

So….

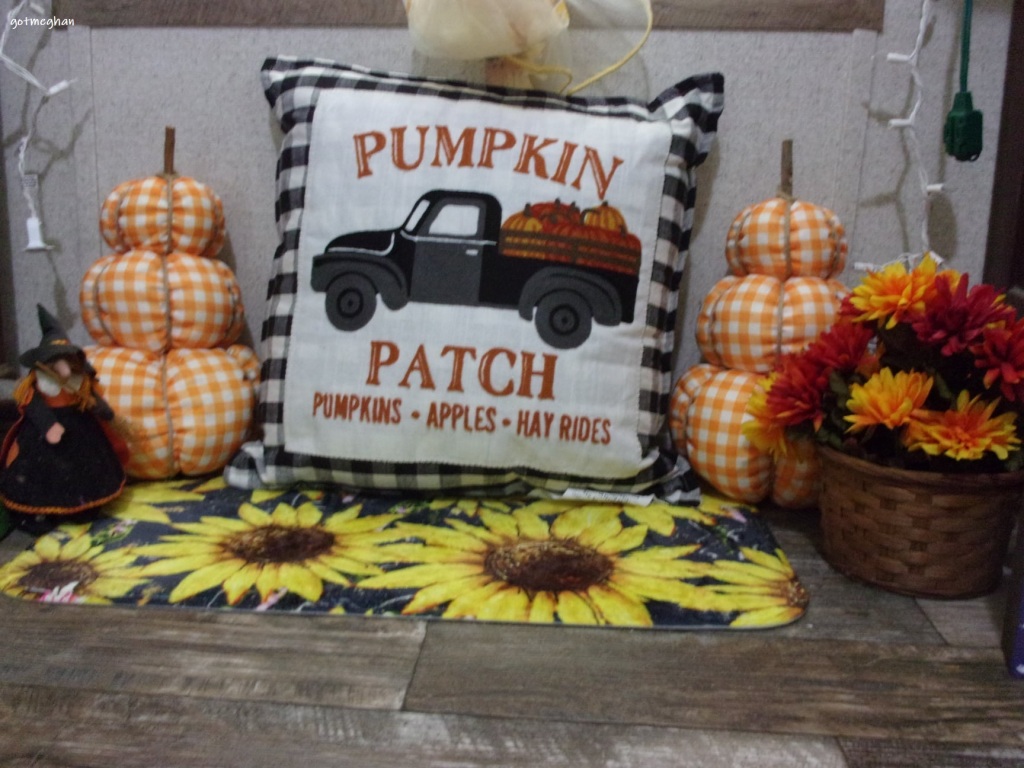
My mom went to work one day and sometimes, they do little games and she had won this beautiful plump black and white plaid throw pillow that is somewhat heavy to lift but has a nice design on the front: it reads, “Pumpkin Patch” in between a dark grayish truck full of pumpkins (my nephew is in love with the truck by the way!) and at the bottom of it, has the words “pumpkins, apples, and hay rides” and it is just the cutest thing ever! It doesn’t match anything in our living room, so mom instantly just gave it to me and I had it for one day before I came up with a brand new plan.

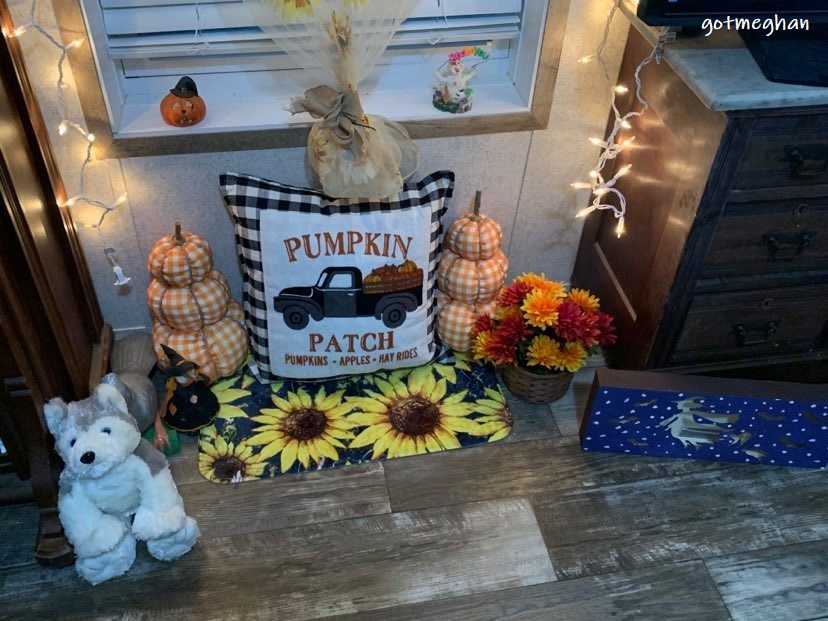
The day I worked on this, I was committed to take on the challenge of moving this pillow around and switching out various things by my window to make my vision happen. I kept my pumpkins the way they were, but moved out the flower arrangement and put the pillow in its spot. Now here was the tricky part. The pillow did not want to stay still once I got it in the right place. Thanks to the silky rug underneath it, all it wanted to do was slide down as I was moving everything around! It was annoying but I got through it in one piece! I ended up having to squeeze everybody together to make sure it stayed upright, and that’s why you’ll the pumpkins sitting very close to it.

The flowers I moved to the right side because on the other side I had another project that has taken me ages to finish, but it is very heavy and takes up quite a bit of room on that left corner so the only thing I had that could fit on that side was a witch figurine that my nana gave me a few years ago that has never had the best luck at finding the right home either, so it was amazing luck that everything worked great together and made the display even better than I had dreamed the night before!

And now I can show you the final result that is in front of my lone window.

During the week my mom received the pillow, we went up north to visit with family for a couple of days, and my cousin Amy, her wife Danielle and their kids came over on the second day we were there and they brought these cute wood cravings in different Halloween-y designs for everyone to do together. Nolan painted the cutest pumpkins ever and my nana and I worked on my witch, I did the sides in brown while I painted the front in this purple-blueish hue and added a lot of white dots everywhere! Inside each craving are lights that are battery operated and mine flicker with multiple colors at once and even though I was slightly angry I added so many dots, it actually worked out great with the lights in the background. We placed it in front of the TV because I don’t have a bigger space for it, maybe I can come up with a better solution next year.

The final item to arrive and put up was one of the most difficult things I’ve ever encountered while decorating and DIYing!

As I mentioned in my haul, I absolutely adore the moon. I have always wanted something that was moon related in my room, whether it was a poster or banner, I didn’t care. However, I found out through this, that it pays to look at reviews before buying because it was a disaster!

When it arrived, we opened the package and it didn’t come with instructions so we relied on YouTube for help, which was fine! The next part was getting them attached to their pedant and this was really irritating both of my parents and what made things worse was we had three that broke upon clipping together and then on top of that, you have one side that is very shiny gold and the back is grey and dull which at first, it was okay, until you went to put them on the wall and they were facing the wrong direction.

We were going to put it underneath my TV, because the base and we were hoping that the gold line would be able to fit across the mantle. We had made that decision after my mom lost the long cord, and after finding it back in the box it came in, we were back to my idea that was having it hang above my bed and it does fit between the long section of the wall and thanks to the Command hooks, it was easy to arrange it like a theater stage curtain with a rounded effect. You could easily have the two markers but I saw an image on Pinterest that had a third hook in the middle so it makes that loop design on each side and I really loved it that way so that’s what we agreed on!

Once we got it hung up on the wall, we kept it there for a bit before deciding on how to fix our next problem. The worst part of the whole thing, was ours had some type of red markings on at least four pieces! Since we were still painting pumpkins during this time, I was allowed to do a little experiment and use purple paint to hopefully solve our issue; and it happened to be the greatest thing because it didn’t matter if they were facing each other or not, at least they were one color. I painted 10 moon phases with two coats of a royal purple on both sides – while the middle moon was left out of the family day of painting and was only covered with one coat with the same paint. This one is more purple-y because of this decision but everybody is in agreement, it makes it look more unique because its the full moon.

Here was the before and after pictures of the moon banner!

In my mini haul, I said I had bought a throw blanket and a T-Shirt but I don’t have any photos of those things. I am hoping I will maybe do a OOTD for you but we’ll have to see what happens because December is coming and I have a lot of Blogmas and New Year posts to get up soon so I might have to do it on Instagram or something.

I hope you have enjoyed this post, and got a kick out of what goes on in my mind as far coming up with a plan and fixing issues while decorating my own room! Again, I have no plans for Christmas décor, but will definitely work on a post if I do get some things soon!

Did you decorate your house/apartment/bedroom for autumn? What was your favorite item? And what was your most frustrating piece to put together?

snowflake

Mini Fall Décor Haul

Hello!

I love to decorate, as many of you know, and one of my favorite seasons is fall. When I was younger, I only adored it because that signaled to me that my birthday was quickly approaching, but now I have various reasons why I love about it.

On Instagram, I follow two accounts that post about everything autumnal and Halloween, and once September starts, the instantly see their content constantly and it’s eerie how quickly I become jealous because most of the time, they are sharing the ALL of the new stuff in stores. By week two, I could have saved up to like 10 items that I’ve found and possible want if it’s not too expensive!

Well, my parents agreed to give me $100 to spend last month, I could spend it on anything I wanted and I went back on Wal-Mart’s website for the third time to search for autumnal pieces for my room; and without the paint for our pumpkins and Command strips (even though those are vital for hanging things up!) I still come back under my original budget, which is really good because like I told my mom it could’ve been much worse!

THE PUMPKIN WREATH – $9.98

This was honestly one of the first things I saw back in early August that I instantly fell in love with, because it has everything I love about this time of the year: pumpkins, the colors orange and red, and sunflowers!

The wreath itself is very unique, because instead of being in a circle shape, it is designed to be like a pumpkin. It looks like it was made with sticks but my mom pointed out to me that it is actually metal! In the middle it has different fake foliage, berries and sunflowers in a series of fall colors. It is honestly so pretty and I like the fact that it isn’t your everyday fall wreath either.

It was hard to figure out where to place this, because I have a section of my wall for seasonal wreaths, blame it on my mom, because she brought home this cute and neon colored sunflower wreath and I thought it was cute and summer-y, thus starting me on this “tower of seasons” thing now.

However, once the hooks came in, I just ended up making my decision by having it hang on the front of my bedroom door. My mom and I actually love the placement. It gives our guests this little nod to fall.

AUTUMN SKULL SHIRT – $16.99

So, for the next item that came in, it drove us a little nuts because when my dad said I received another package in the mail, he said it was “pants” and I knew I didn’t order any pants. I was thinking about it but couldn’t find anything that I liked so I kept thinking on what it could be, and then I remembered my list and I thought dad had misread the text and instead of “pants” it could be “paints”? Well, after we got into a little argument about it, he opened it up and found out we were all wrong and it ended up being my shirt.

I was torn between this one and another I found, but the image on the website looked like it was glittery and I do not deal well with certain textures on my hands and this realization was the result to the conflict. This top is in a darker grey, and has the outline of an adult size skull in black on the right side whereas the left has green, yellow and orange colored leaves and a large sunflower in the eye socket.

I may not listen to heavy metal as much anymore, but I still enjoy my skulls and spikes hardcore, so when this popped up, I couldn’t say no to it. Hell, my parents wouldn’t been able to deny it either! I mean, if you are close to me, you would automatically say “this screams Meghan!”. So, I purchased it and my dad did say it is badass.

STACKED PLAID PUMPKINS – $16.99

For this next one, I was really unsure about it. I absolutely loved them to pieces, and the fact you got two for the price, I thought it was too mean to not get it but I didn’t know if I enjoyed the plaid part so much. These pumpkins came in both black and orange, and for a good thirty minutes I was going for the black and white ones. I thought they would fit better with the rest of my black stuff but honestly the orange just seemed more practical for me.

They are so adorable! When my mom brought them into my room, they were wrapped in a mesh case that looked easy to take apart, – I don’t do this because I can’t get my toes around a pair of scissors! Anyways, the pumpkins are stacked together with each one in a different size, overall it is medium and could fit anywhere you chose to put it, whether it’s on your porch or in a corner of a room.

MOON PHASE GARLAND – $20.94

As I mentioned at the top, I had two items that really inspired me to decorate my room for the season. I have always been interested in our planet system, my favorites are: Earth (of course!), Moon, Jupiter, and sorry to anyone who says Pluto is a dwarf moon, but I still adore Pluto. Anyways, the Moon has a lot of meaning for me. If I am outside at night, I instantly want to find the moon. I love to look for it during the day and night, and I am one of those people that will stop doing something and point with my big toe and say “there’s the moon!” So, with that being said, I want it even closer to me and make it part of my autumnal bedroom.

They have this banner or garland in two different colors on Walmart’s website: gold and silver! I haven’t been the biggest lover of gold anything, but since my walls are basically grayish, it wouldn’t look right in the silver. I just didn’t think it would shine as well, so I went for the gold instead and honestly, it can be a fall time color or at least that’s what I keept telling myself!

One little warning for everyone reading this post, since my mom and I had so many issues dealing with this, it might be easier doing everything DIY! The fact that we had no instructions, three pieces had some kind of red marking on the gold side, the clip to hook it to the top and pendent were hard as a rock, and half of the phases will not turn over to the gold (and because of that, I now have to paint them all!) that my dad literally hollered out to mom in the mist of this, “next time you are inspecting the list!” but honestly I don’t think they would have helped us in the end! Click here to find the video that seemed a lot more easier and cheaper compared the hassle we endured.

AUTUMN LEAVES BLANKET – $21.99

So, this is the final thing I got because let’s be honest, you can NEVER have enough blankets, right?! The really awesome part about it though is that, it arrived on the first day of fall too!

I have six blankets on my bed, four of which actually serve a purpose for me, but all but two are Christmas themed. Yes, this was my reason for wanting to get this blanket! To be honest though, my Transformers blanket is getting old, and feels really worn at times so it’s time to retire it.
For this blanket, it is fleece, which is like my favorite thing in the world! They keep me warm and I tend to use them to help ease my elbows–if I don’t have one underneath my elbows and lay on one side for too long, the skin on my elbows can break and according to my mom, it is a space that is really difficult to heal! The blanket is a light beige colored with a lot of varied reds, orange, brown, and yellow leaves scattered around the entire sheet.

WHITE CORD LIGHTS – $11.98

Last Christmas, my mom got me a box of “white” lights to wrap around my tree, but unfortunately the tree itself was way too small for them so we improvised and put them around my window and it just looked gorgeous surrounded by the tulle sunflower curtain that you instantly feel so much joy about what it brings to such a small space.

In the span of late November to mid-April 2020. we used up the lights a lot and I say “we” because I know for a fact that other people in my family enjoyed them just as much as I do. We did try to purchase another set of lights, but everytime we went to plug them into the sockets, they were blink like crazy and I didn’t like it and neither did my mom, especially since I tend to leave them on all night, I knew if we kept these on like usual I would be more paranoid than I already am at night. So, within an hour and a half after my parents put them around my window, I said nope and that was the end of that conversation.

Thankfully, my mom went to Dollar General about a week after I made up my original list of fall decorations and she found out that they were putting out early Christmas items and one of the things they had on the shelves were two boxes of the right kind of lights, which are the white cord and white or “warm” lights. They were on sale for $2 a piece so she ended up buying me two boxes just in case we needed a back up later on! After barely six months of being in the darkness again, I have them back and it feels even more like fall to me inside the four walls of my room. Although she found them from another store, I have the same brand linked to Walmart, and of course since Christmas is right around the corner the price went up to almost $20 but still, I don’t think this wouldn’t mattered to us either way!


Sometime next month, I will put up the kind of “decorate with me” or “bedroom tour”, I haven’t exactly figured out what the title will be but it’ll be about where I put everything in my room. You’ll see everything I got and hopefully by the time it goes up, I will have a before and after snapshots of the moon garland too. Cross your fingers and toes that it goes well for us! 

Now it is your turn, I want to know what kind of stuff you like to decorate around your space? Do you have a specific aesthetic you follow throughout each room? What is your newest piece you have now?

snowflake