Hello!
As you may have noticed, and I still don’t know what happened because I had plans, but we didn’t put out any pumpkins this fall. My sister did, she decorated her entire front porch with various sizes of pumpkins, but we did not. I found it very surreal, because that’s my favorite thing to do in September and October is paint pumpkins. After that, I think my body was like, “okay, we need to find an alternative fast!” because this project came out of nowhere, but it ended up becoming a new favorite of mine.
In mid-October, I started looking for birthday gifts that weren’t books (I know it’s shocking!) and I found these wooden shapes and I sort of fell in love with them and then I found ones that were Christmas related and then all hell broke loose in my brain!
In the last year and a half, I’ve been watching a lot of reels and regular videos on YouTube of dot art. I still don’t remember what inspired the find in general, but I’m forever glad it came into my life. I used it in my 3 projects last Christmas. It was only a simple red dot here and there with a Q-Tip but it was still a new thing for me and I loved it. I have been working on it throughout 2021 and I finally felt comfortable enough to use the technique in my new project: the Christmas ornaments!
What you will need for this DIY:
- Wood cut outs – it’s important for them to be “unfinished”
- Acrylic paints
- Paintbrushes
- Dotting tools
- Damp washcloth
- Paint palette or paper plate(s)
Before we get too into this part of the post, I wanted to show you how the ornaments came in the mail.
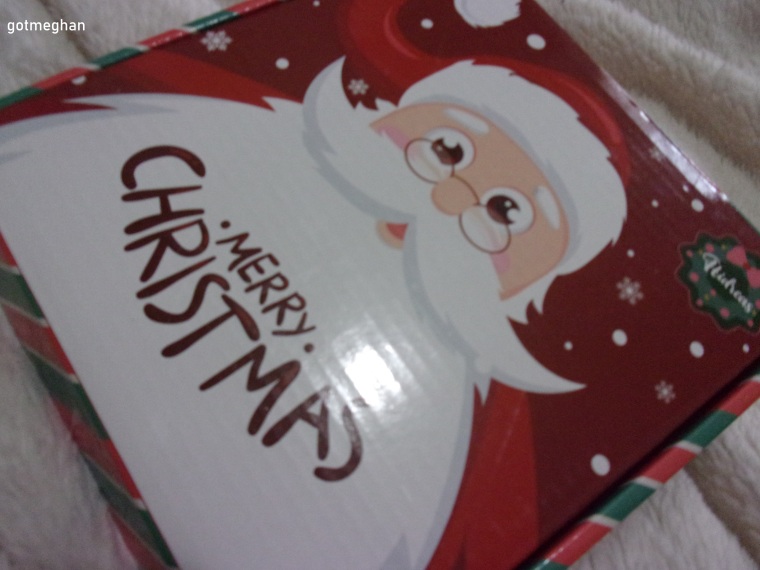

They were perfectly stuffed into this cute Santa Claus box. I was originally going to get the 160 pieces but I’m glad I switched to the 40 pieces because I would still be painting right now! Anyways, they were four traditional Christmas characters: a snowflake, bell, tree and baubles. You get 10 in each stack, so you have multiple designs you’d like to trade off, you are welcome to do it evenly. If you would like to purchase this set or the others, click here for the Amazon page. You also get clusters of string for each of the ornaments, plus a small bag of metallic beads, but I did not use them.
Raining Dots
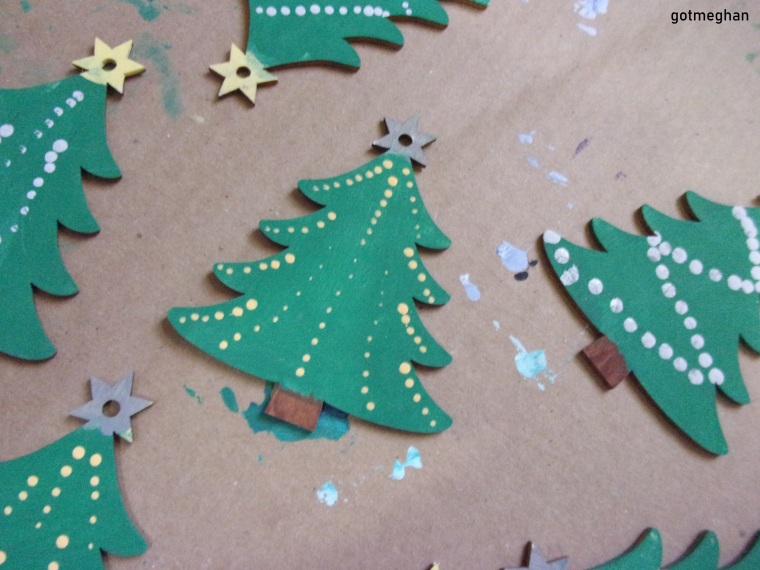
I started with the Christmas trees, and I copied the same color scheme I did with my last project, so I mixed my green with a tiny bit of blue and I love how they all came out. After finishing all 10 trees with their base coats, I moved on to the trunk and I poured a small amount of brown into my palette, and I used one layer of paint for that part. I am a lover of DecoArt acrylic paints, (thanks to Lydia May on YouTube!) I usually don’t need more than two coats depending on the shade, and I was very happy with my color choices this time around, including the yellow!
Once everyone was in the process of drying, I switched my attention on my design ideas for a few of my baubles. I knew I wanted to create a series of animals, but I’m not really good at it so I went looking on Pinterest and found a great step-by-step guide of the Fox for my friend Brittany. She was the one who really inspired this part in the first place. I continued to search for guides of the Cow and Pig, but I wasn’t able to find anything, so they were basically all free-foot sketches. After that, I stopped for the day, and came right back to it the next day.
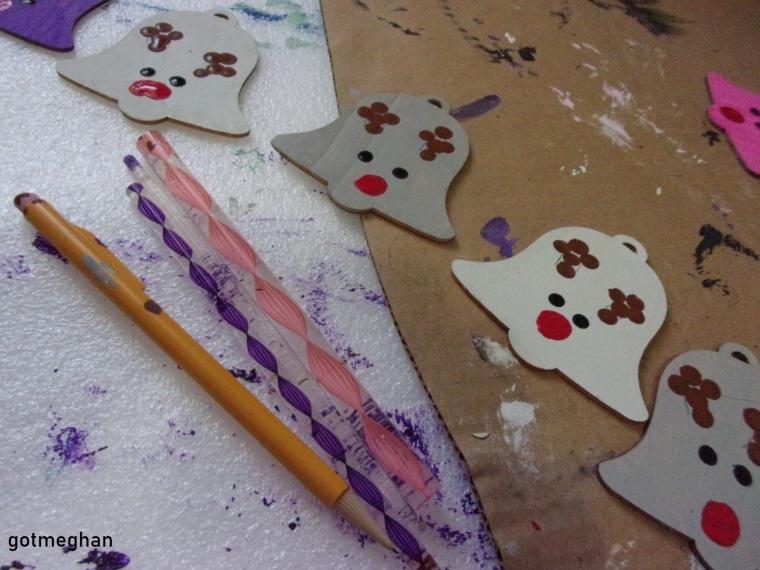
A couple of weeks ago, I was finally able to add another selection of dotting tools. I have the smaller sizes, and I’ve been using them for about a year now and they are very nice for me to grip my toes around and make my dots, but the others are various sizes and I have been wanting to get them for a while now because I wanted to try my foot at the larger dots. I am having issues how to grip them, but I expected that to happen. I knew I wasn’t going to go all out with my designs (honestly, I had the phrase, “less is more” in my mind the whole time!) and I tried to keep it that way.
When I came back to my trees, I was ready to decorate everybody, and I used two colors: yellow and a light gray (I mixed my gray with a tiny bit of white!) and I painted the stars with those colors and would switch the yellow star with silver garland. I was smart with this; I drew out a zig-zag design on most of them and would follow the lines with my dotting tool and I really loved it! Some look like traditional Christmas trees, but there are five of them with the “walking technique” which is coating your desired tool with paint and dotting down the canvas, I love this so much I did it to my Bonsai pot in the spring! My parents saw the final tree with this design, and they love it. Honestly, everyone I’ve shared it to, has expressed the same thoughts too!
So, here are how the trees turned out.

There Goes Rudolph!
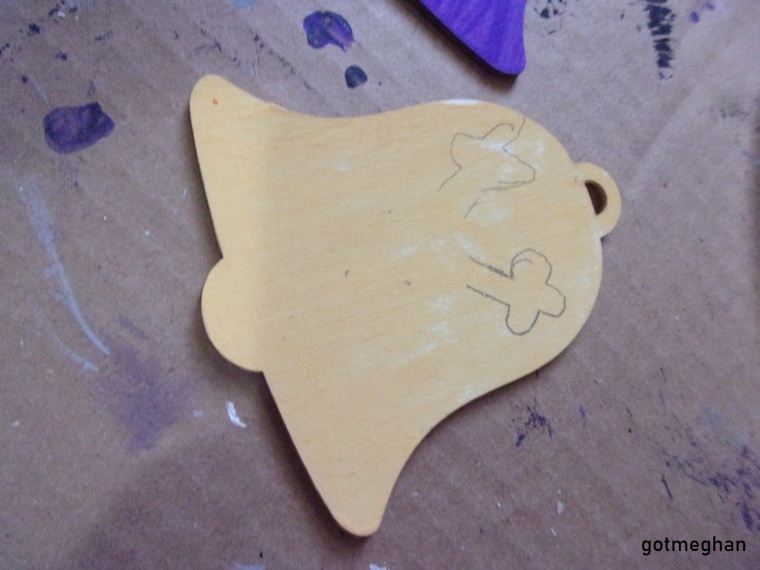
The second (or third) shape were the bells. I wasn’t impressed with the bells at all, they were very boring even without paint on them…
My thinking behind them was the golden bells you normally see on pictures, but I could not get the yellow to turn to a pretty gold and I tried like three different times and was only successful after finishing with them. I was so mad at that point, but I moved on though. Since I had 10 of these bells, I was influenced by a fragment of a carol “with silver bells ringing” I kept hearing while doing the base colors and I created the silver hue again for the rest of my bells and I thought they looked so adorable!
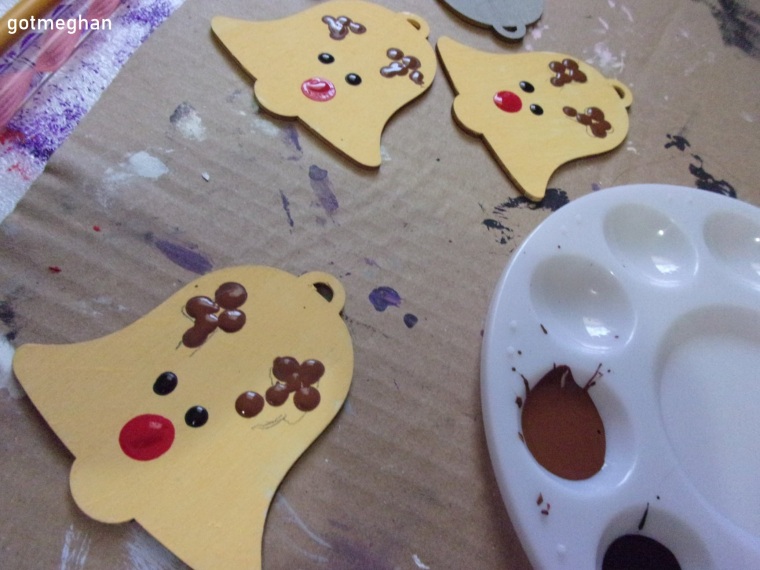
I left to dry overnight and I was really worried about how boring they looked, so that night I thought about adding a reindeer face on it and in my dreams they looked so cute and I was over the moon when I started sketching out how I wanted the antlers to go, but once I started doing my dots I got a little worried because the design started to look a little bit like a pair of balls and by my second bell, I became terrified at what was appearing but thankfully my mom thought they were great, especially after I put the eyes and big red nose at the end.
The reindeer/bells are definitely my favorite, even with the cock and balls antlers, they still look amazing! I did a good job on them and that’s something I rarely do when it comes to painting, is enjoy what I am creating, and lately it’s been so fulfilling to believe in my artwork for the first time.
Let It…
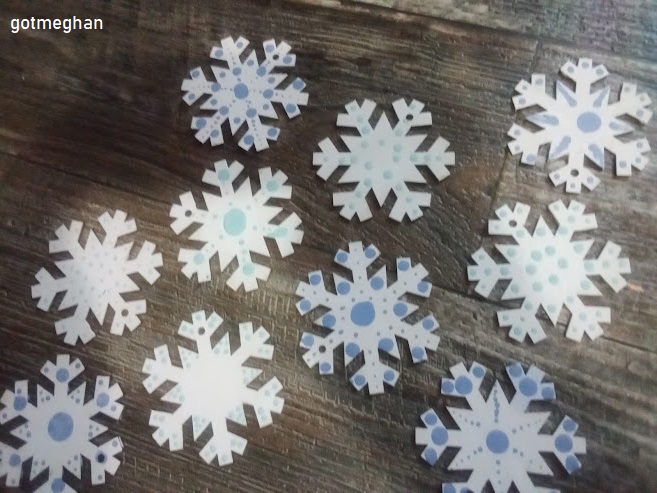
For the third ornament, we have snowflakes.
I think both the trees and snowflakes were the easiest to do because they required a small set of skill. You can free hand your designs to make things simple and they would still end up being very beautiful. When I began on the snowflakes though, I thought I would be able to play with my various sizes of tools, but I rarely got away from the blue tool, which is a little bit bigger than the purple tool. I basically treated the flakes like the trees when it came to their designs and used the walking technique quite a bit throughout the process.
And like the trees, I kept my color scheme pretty limited, I only used white for the base and used two different blues, but my favorite shade was the bright, neon like because it reminded me of the Frozen films. I’ll be honest, I had Queen Elsa and Princess Anna (and of course, Olaf too!) in my head all while I was working on these and I’m glad I did because it got me out of my head, and I allowed myself to make mistakes with them because I mean every snowflake is one of a kind so I just left them the way they were… well, some of them! There were 3 that definitely had to be fixed but after I was done, I basically pushed them as far away as possible, so I wasn’t able to add more dots!
The Cast of Characters
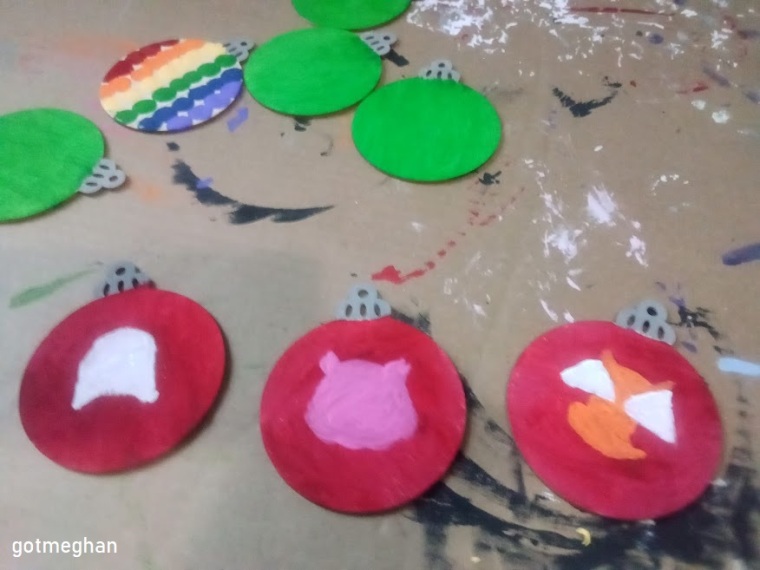
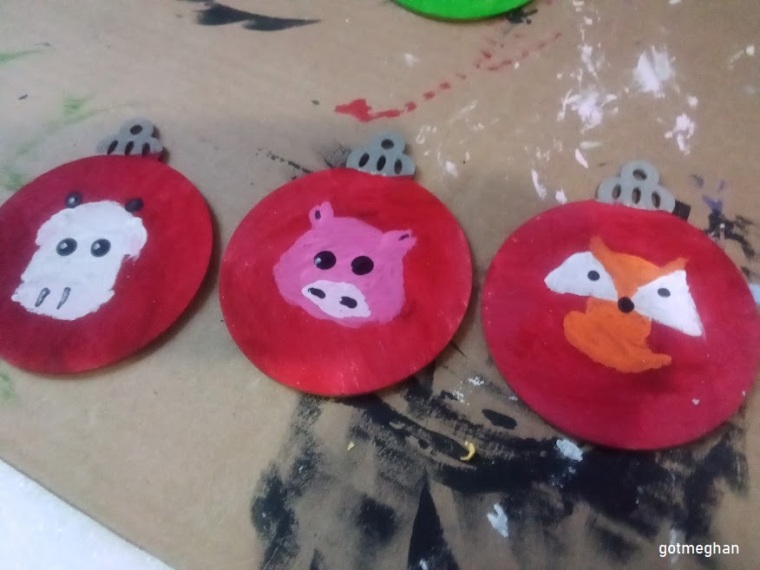
Lastly, the bauble balls were my least favorite because I knew what I wanted to do with a few of them and it scared the living daylights out of me! I got through in one piece thank God, but not without psyching myself out in the first round.
So, like I explained above while I was waiting for my trees to dry, I got started on figuring out what I wanted for three of my baubles, the rest was pretty much left until I did the base coats. I treated the baubles like the bells, as I split them up as they were painted in traditional Christmas colors: green and red. I was so worried the red would be too dark for my animal baubles, but thankfully they design held up great against the paint, and I was still able see every part.
My biggest worry now was, do I have a brush that was small enough to paint the character without creating a big mess around it, and I was thoroughly surprised as I found a tiny brush that was not only perfect for the designs, but it quickly became a favorite of mine because it allowed me to gain back some of the control as far as what I wanted to bring into each animal. I didn’t stop using my dotting tools though as I had made the eyes and noses with a small tool, and they turned out as adorable as my Rudolph/reindeers in the end.
When I was done with them, I was fairly tempted to leave the rest of the baubles plain, but I thought they looked too boring for that, and I started experimenting and I made array of different ones but I did one that spells the word “Woof” for a family friend, they have a Pittie and they recently got a Beagle puppy so as my mom told me, “it fits” for them, and then I surprised myself again but creating two baubles in a Ugly Christmas Sweater design and I’m still upset I did just do that with the rest but it was just a beautiful disaster that I need to remember for next Christmas!

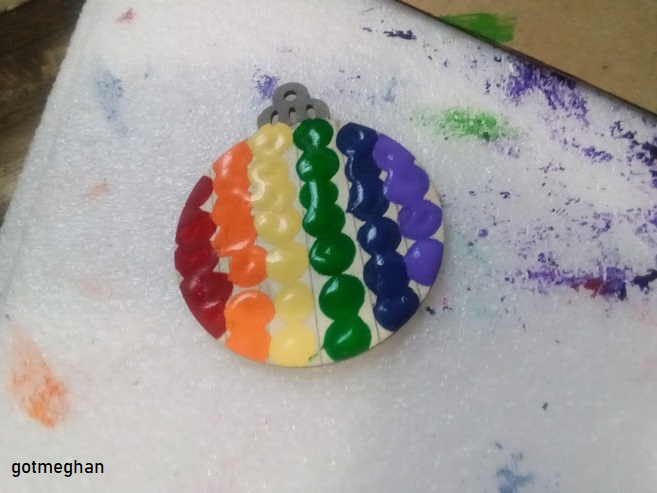
Bring Me the Rainbow
My final bauble is very special because it is my nephew’s. Nolan has become obsessed with the moon and rainbows, and since I already got him a Moon phase garland for his room, I figured I needed to bring out his love for the rainbow too, so I reserved a bauble ornament for him. I don’t know why I didn’t do this with my nana’s ornament since she too is obsessed with the rainbow! Oh well, I will make a note of this for next year!
I was thrilled to do this for Nolan but I was also terrified too because I had to use the ruler to create a series of lines for each color, and honestly, this was a doozy! I was having a hard time making six, somewhat equal, lines for each dot and it was a hard task at first but once I got it all figured out, I poured out my paint on my palette and got to work on the actual dots.
This media has also become a favorite of my nephew too. He currently had two or three CDs I’ve made in the last year or so, the first one he just took home and the others I gave him because he kept holding onto them. I think in the new year, I will try to teach him how to do it so he can be excited about his own creations too! Anyways, I used my pink tool, which is the middle size and honestly, it was actually perfect for this design. I was going to use the tiny brush again to remove the empty spaces in between the dots but I stopped myself from doing it and messing the entire ornament up. Nolan was very excited to get his ornament. I don’t think he understood at first why I had given him a different design compared to his mommy’s pink reindeer, but I know he will cherish it nonetheless!
It is strange when a small thought that can appear in the middle of a sleepless night, can grow into such a huge project and yet bring so much good to a slice of the world. Homemade gifts are good for the soul. I give kudos to anyone who has a small business and fix up orders every day, because that is no small feat! As I told my nana the other day, now that I am done painting and the cards were shipped out and people are receiving their ornaments, I still feel like I need to be doing something, and I really hope it was finishing this post.
I really hope you have enjoyed reading my process with this project. It was fun while it lasted, and now I can relax for the rest of this break. If you celebrate Christmas, I hope you have a lovely time with your family, friends and/or pets. For anyone else, have a wonderful weekend!


2 thoughts on “Blogmas: Wooden + Dots Ornaments”